The first 11 things you should do with your Apple iPhone XS or iPhone XS Max
Essential tips and tricks to help your master your new device

Last year’s iPhone X brought a massive change to Apple’s smartphone experience, ditching the home button (and chunky bezel) for an edge-to-edge screen and slick gesture controls. Now every new 2018 iPhone is like that.
And if you’ve just bought an iPhone XS or iPhone XS Max, or you’re planning to, then chances are pretty good that this is your first experience spending a lot of time with this bold iPhone reinvention. Luckily, it’s pretty great – but there are a lot of things you’ll need to learn if you’re coming over from an older iPhone.
Trying to wrap your brain around the iPhone XS or iPhone XS Max? Here are some of the critical tips and tricks you should harness to get up and running with ease and make the most of your new handset, not to mention some of iOS 12‘s best new features.
1) Learn the gesture controls
If you’re not coming from an iPhone X, then your biggest adjustment with using the iPhone XS or XS Max will surely be learning to use the various gesture controls instead of the home button. Luckily, it doesn’t take long for them to feel like second nature.
Swiping up from the bottom of the screen brings you back to the Home grid of apps, and you’ll also swipe up on the lock screen to get Home once Face ID recognises you.
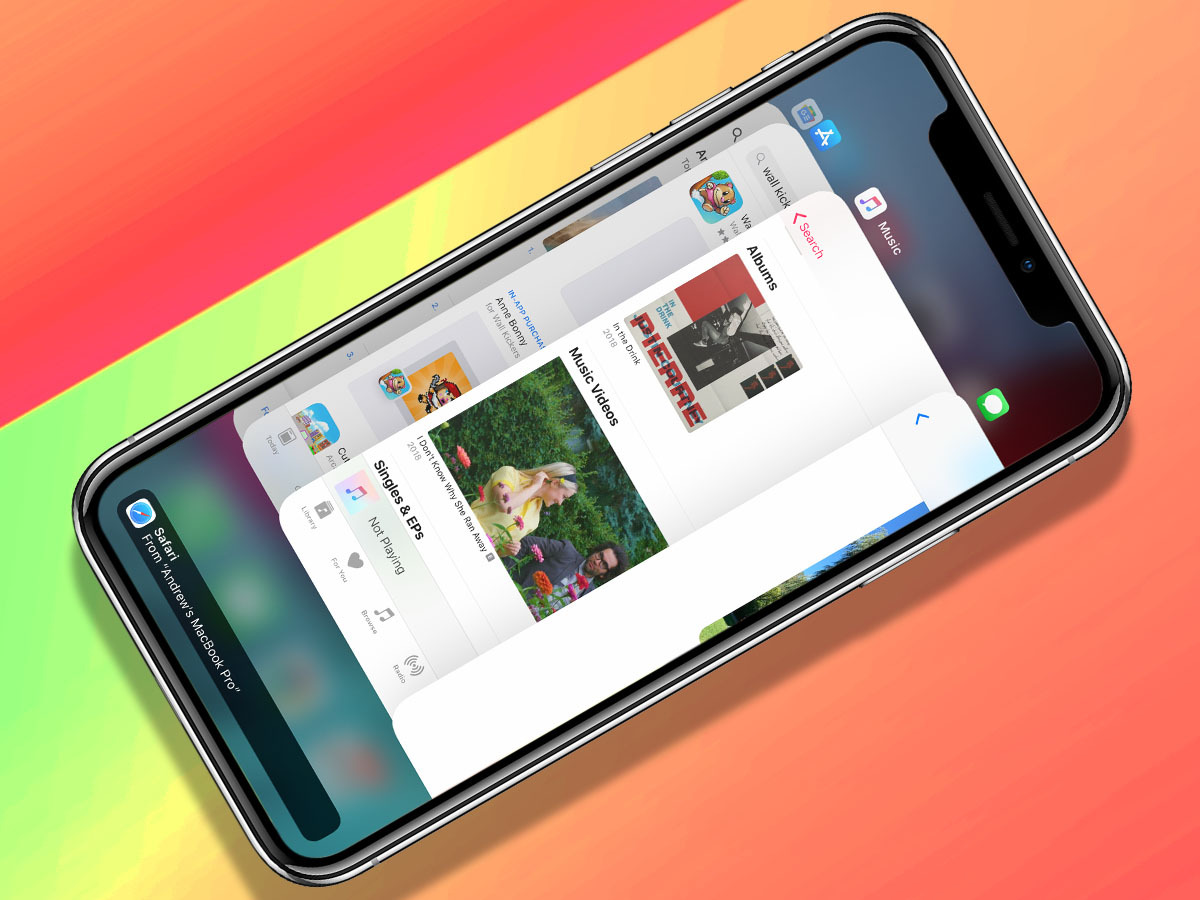
If you swipe up and then hold your finger for a moment, you’ll bring up the multitasking menu, which lets you switch to another open app… or swipe up on the image of any app to close it.
See that little bar at the bottom of the screen? You can swipe left and right on that to quickly swap between your open apps, saving the hassle of pulling up the multitasking screen to move between a couple of apps.
And to access the Control Centre and change certain settings, swipe down from the upper right corner of the screen. We’ll be getting deeper into Control Centre ahead.
2) Get your face in there
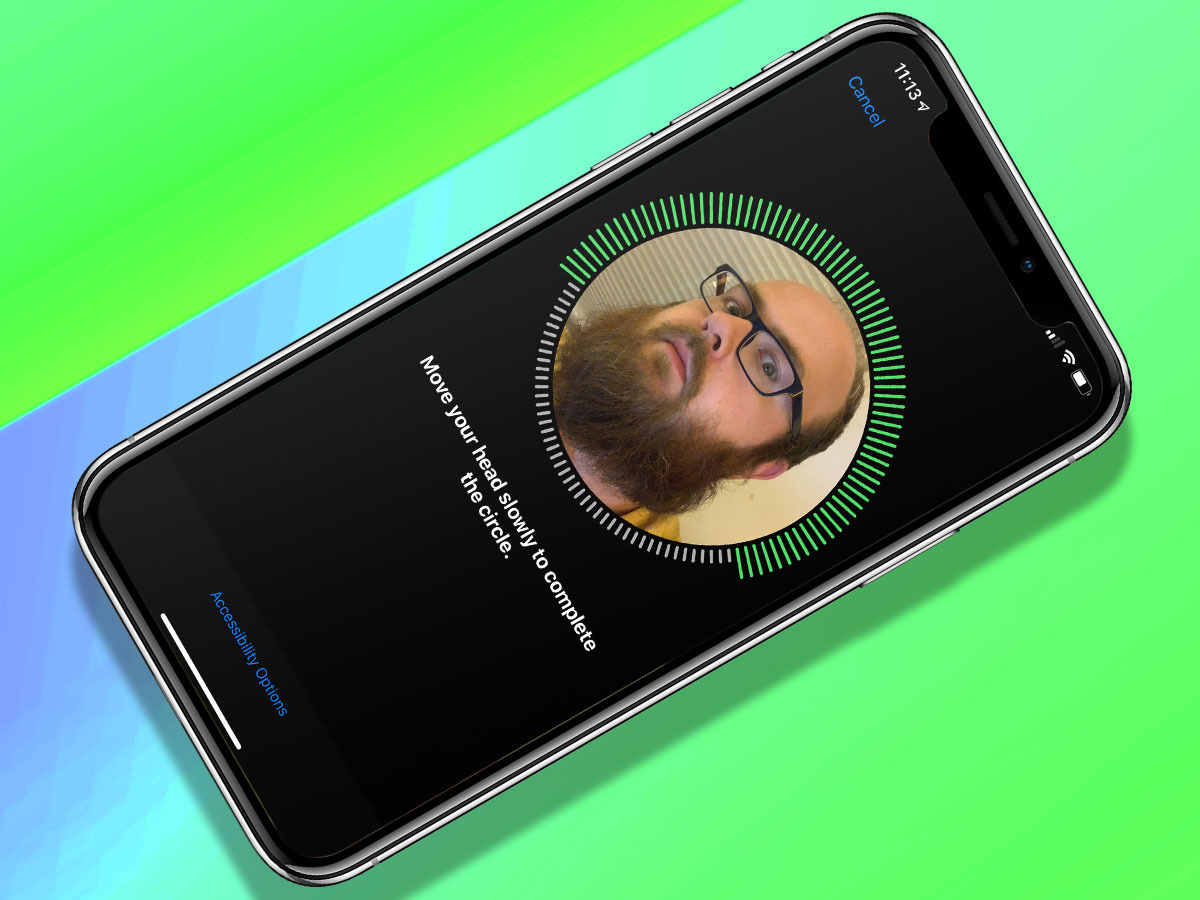
Farewell, Touch ID – we loved you so. Apple’s fingerprint sensor is officially old news with the rollout of this year’s new iPhones, but that’s OK. Why? Because Face ID, first seen on last year’s iPhone X, is actually pretty brilliant. And it’s faster than ever on the iPhone XS and XS Max.
Face ID lets you unlock your phone with a glance – and yes, your eyes need to be looking at the screen – plus you can use it to validate Apple Pay, buy things from the App Store, and automatically enter in saved passwords.
If you didn’t already complete the process during initial iPhone setup, it only takes a moment. Just head to Settings, scroll down to Face ID & Passcode, and you can register from there. It’s as simple as rotating your face around twice… and that’s it. Face ID can also recognise you while wearing glasses/sunglasses or a hat, and it only gets better at spotting your mug over time.
Also Read › The best Apple iPhone XS deals
3) Make your Memoji
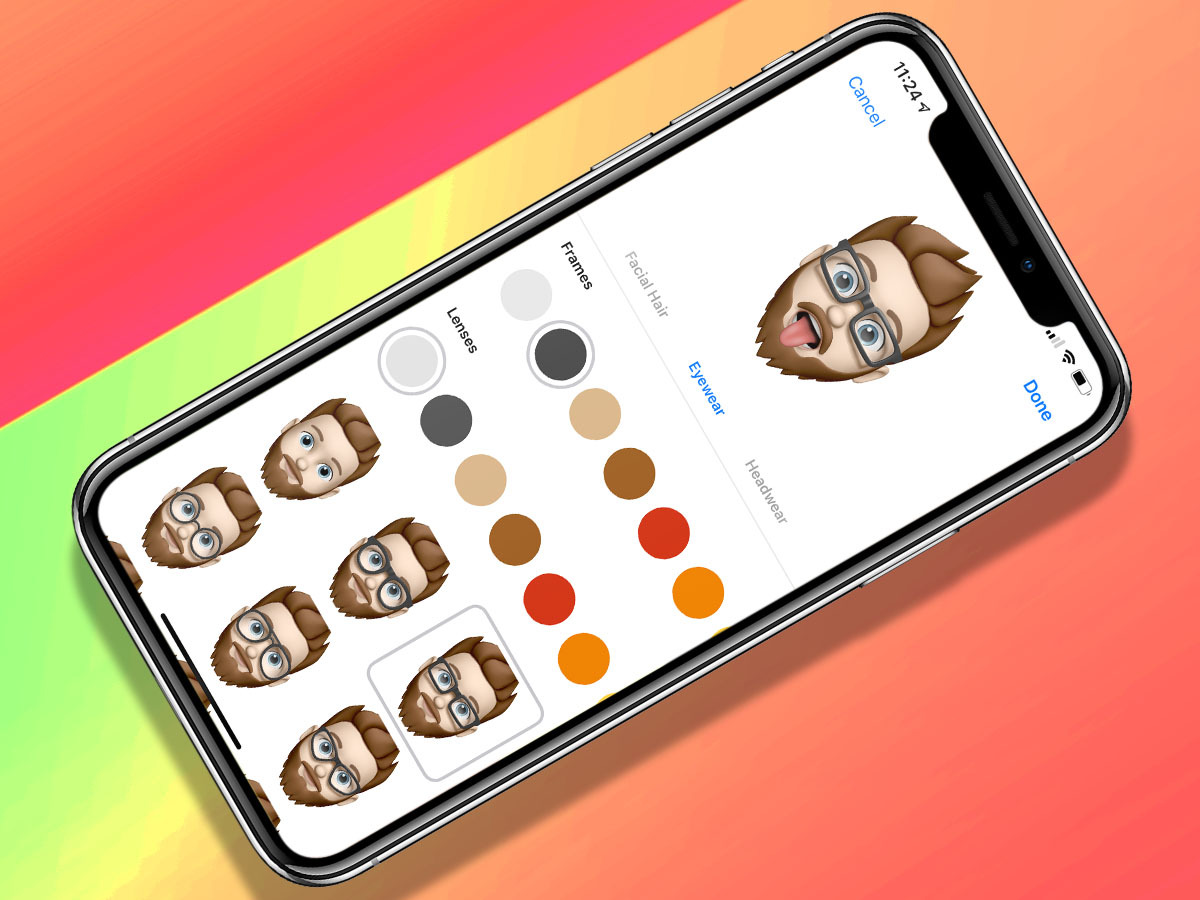
Last year, the fun trick with the iPhone X’s TrueDepth camera sensor was Animoji, which translated your real-time facial movements and mannerisms into the cartoonish face of a pig… or a pile of poop. Those are still onboard (with more faces, too), but now you can also create yourself as an animated emoji.
And it’s fun, too, much like creating your own Mii back in the Nintendo Wii’s heyday. While in Messages, just tap the little Animoji button at the bottom and swipe all the way to the right to find the option to create your own. You’ll find plenty of customisation options within, from hair to eyes and other facial features, all in an effort to turn you into a cartoon. Take your time to get it right!
4) Utilise Screen Time
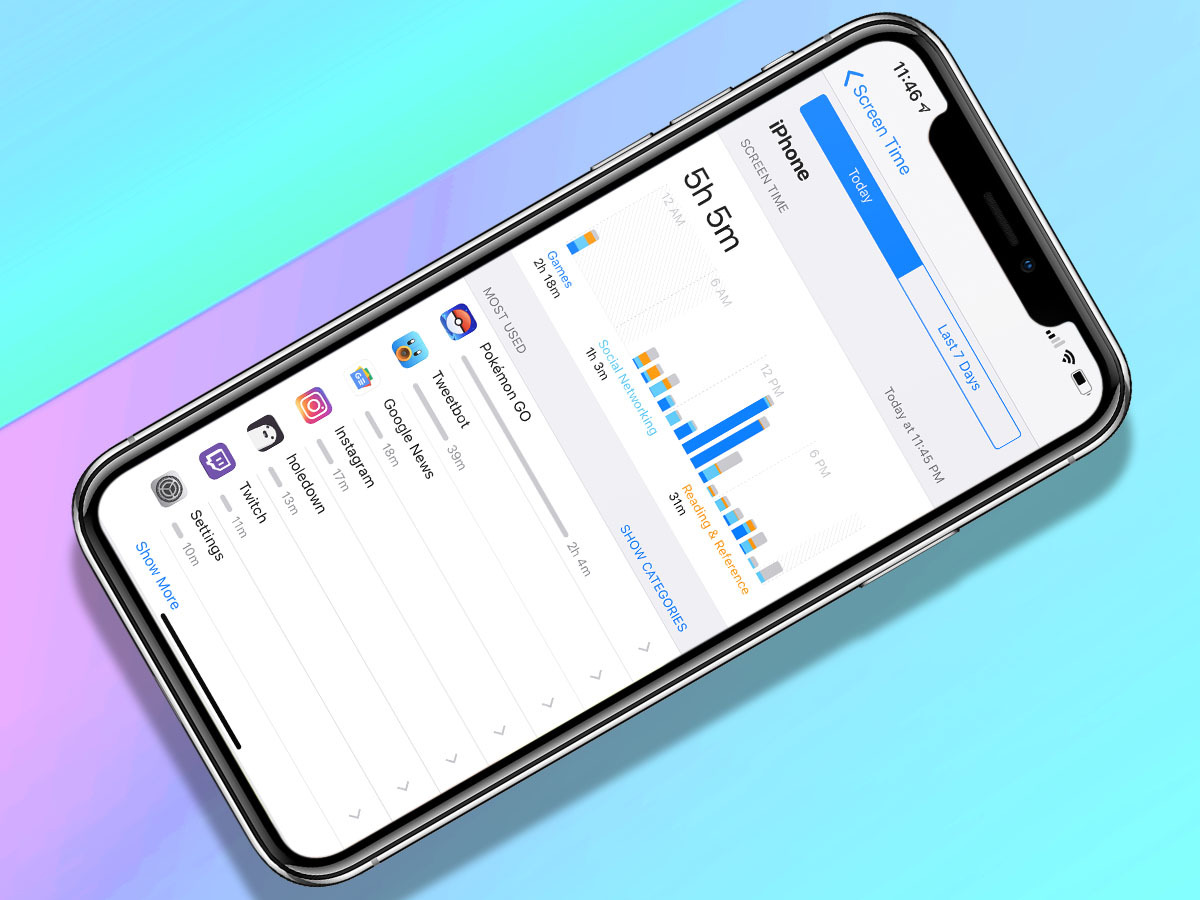
One of iOS 12’s most intriguing new features is Screen Time, a feature designed to make you aware of your usage habits – and help you address or limit them, if you so please.
Essentially, it tallies all of your screen time each day and week and splits that up by app, but also by app category. You can see which apps and games suck up most of your time and when you’re using them, along with how often you’re picking up your phone and how many notifications you get… and also from which apps and when. It’s pretty comprehensive.
What’s the point of all of this? Well, it’s meant to give you a heads-up on how much time you’re actually using your phone, and the totals might surprise even you.
And it’s actionable data, too. You can set scheduled Downtime, which is a span of time in which only whitelisted apps and phone calls are available, or you can limit the amount of time any app or app category can be used daily. That’s great for kids, too, plus you can sync these settings across multiple iOS devices – like your iPhone and iPad, for example.
5) Pay with a double-click
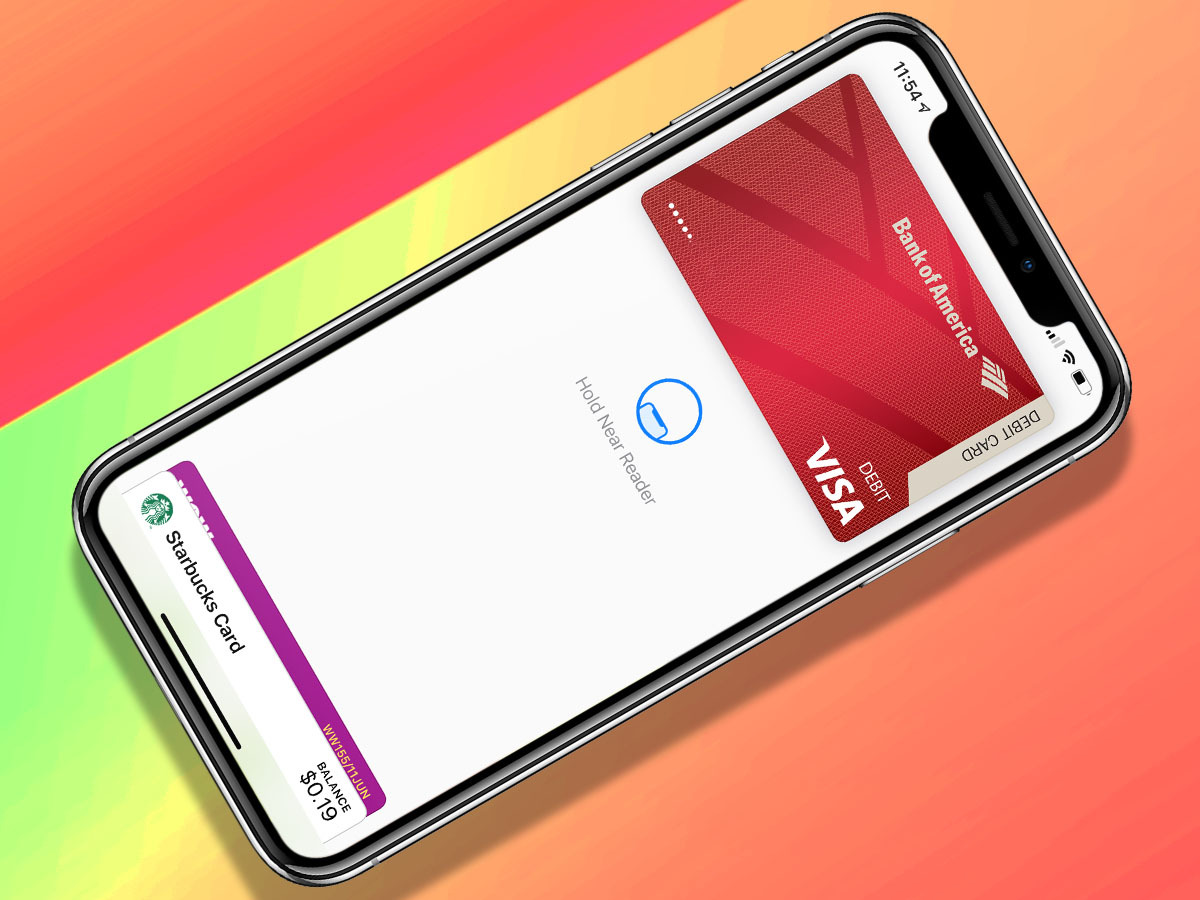
Although the authentication method has changed, Apple Pay is (of course) still a major feature on the iPhone XS and XS Max, and it’s very easy to get into.
Just give the right-side button a quick double-click and it’ll pop right up with your debit card ready to pay, and now Face ID is used to verify your identity and authorize transactions. Once the app recognizes you, just hold your phone to the contactless reader to pay. You can also use Apple Pay to send money to friends via Messages.
Initial setup only takes a moment, thankfully. Just head to Wallet & Apple Pay in the Settings menu, and tap Add Card. You can scan the card with your camera or just input the digits, and once your bank automatically authorises the addition, feel free to pay away.
6) Tame your notifications
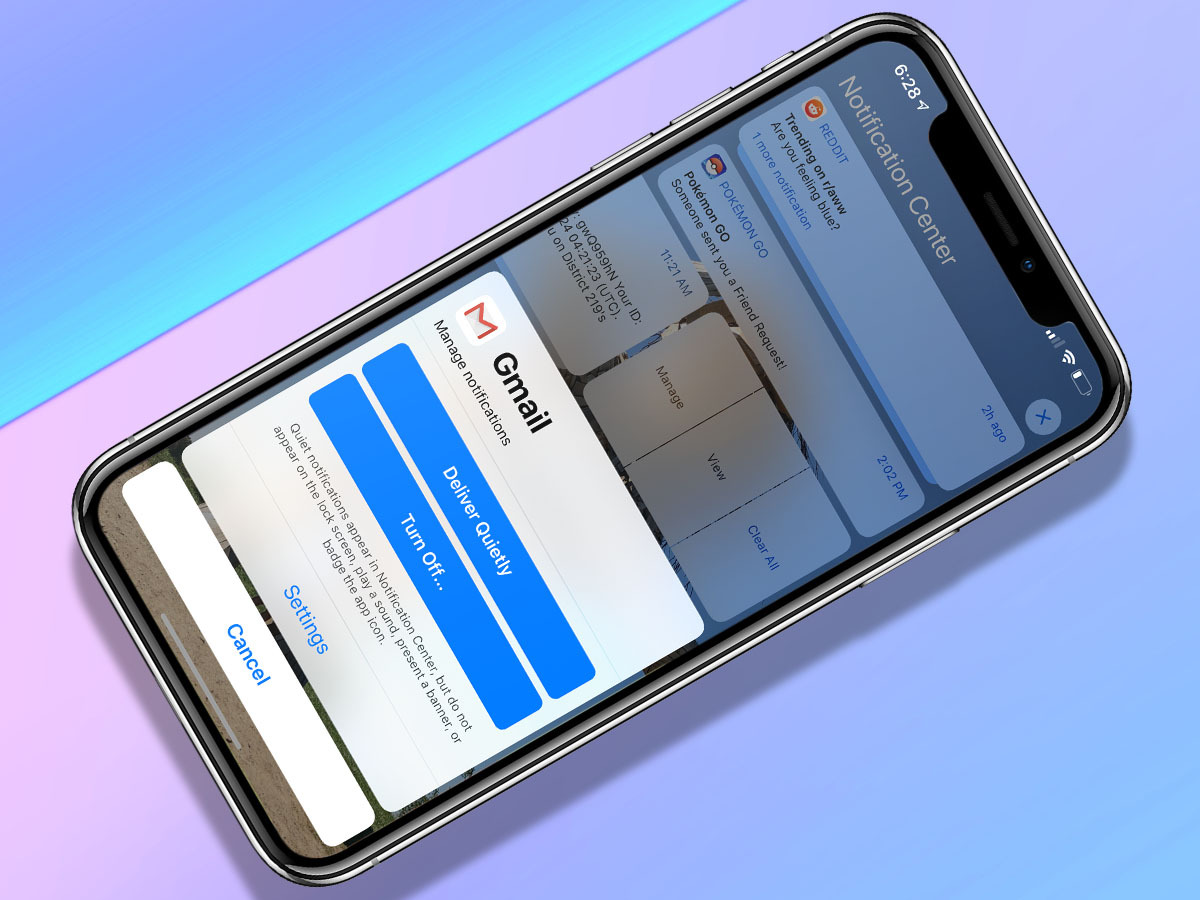
Notifications help you stay informed and connected to the people around you… but notifications can also be massively annoying, bother you during inopportune times, and keep you from focusing on work or other tasks. Finding a middle ground takes a bit of work, but it’s well worth it.
In iOS 12, Apple groups notifications from the same app to save a bit of mess on your lock screen and Notification Centre, and you can swipe left on anything to find a “Manage” option. Tap that and you can choose to have that app’s notifications “Deliver Quietly,” which means they won’t pop up on the lock screen or bug you with a sound, banner, or badge; they’ll just be in Notification Centre.
You can also turn them off entirely, if needed, or hit the Settings button at the bottom to fine-tune your options.
7) Use True Tone
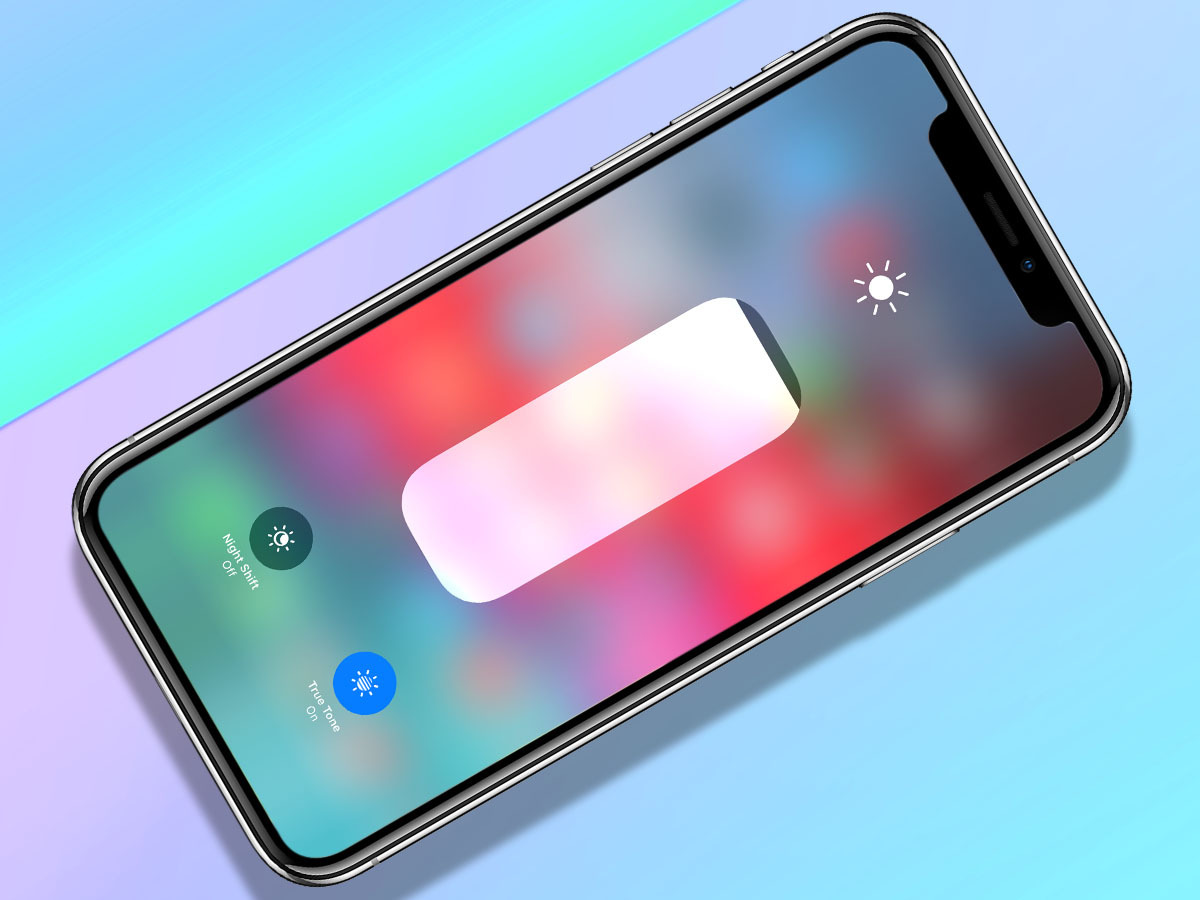
If it’s been a couple of years since you upgraded your iPhone, then you might not know about True Tone displays. Introduced with last year’s iPhones, True Tone is a feature that uses sensors to automatically measure the ambient light around you and automatically adjust the colouring and white level to match.
It’s claimed to help reduce eye strain and ensure correct colouring no matter your current lighting conditions. It takes some getting used to, especially if you’ve spent years staring at screens that stay the same at all times, but it could be worth it to save your eyes some trouble. Find it under Display & Brightness in the Settings menu, or access it via the Control Centre (keep reading ahead).
8) You’re in Control (Centre)
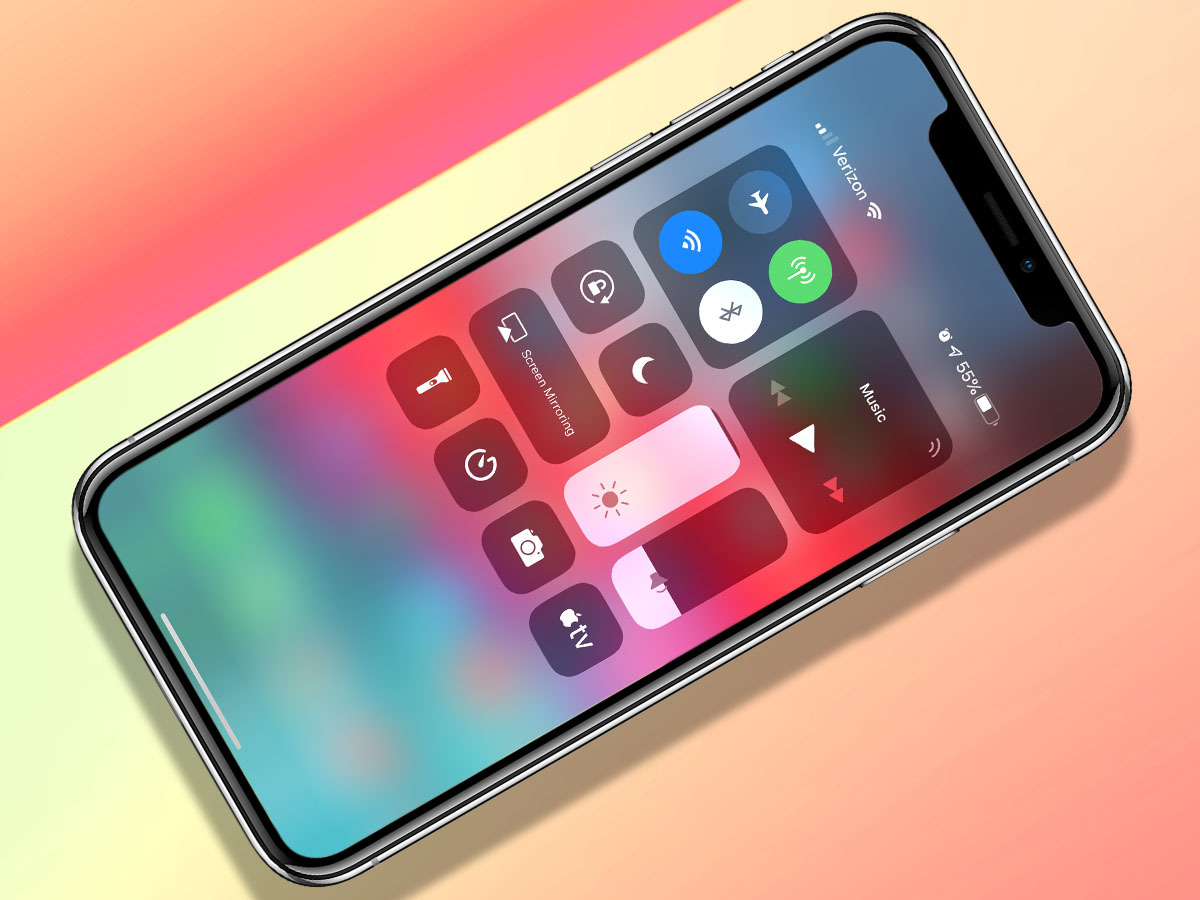
As mentioned earlier, Control Centre is accessed a bit differently on the iPhone XS/XS Max/X, but once you get used to that, it’s a pretty handy feature that you’ll probably tap into regularly for things like Bluetooth and Wi-Fi controls, or turning on the flashlight.
There’s a bunch of buttons on the screen, and hey, you can add more if you’d like. Head to Settings, Control Centre, and Customise, and you can choose from numerous more optional additions, such as quick access to the Apple TV Remote, Accessibility Shortcuts, Alarms, Guided Access, or Low Power Mode.
Once you’ve tamed and tweaked Control Centre, note that you can also use some 3D Touch trickery there. Hold down a little harder on the flashlight, for example, and you can adjust the sensitivity of the torch. Meanwhile, the brightness slider lets you access Night Shift and True Tone options via 3D Touch.
9) Adjust your Portraits
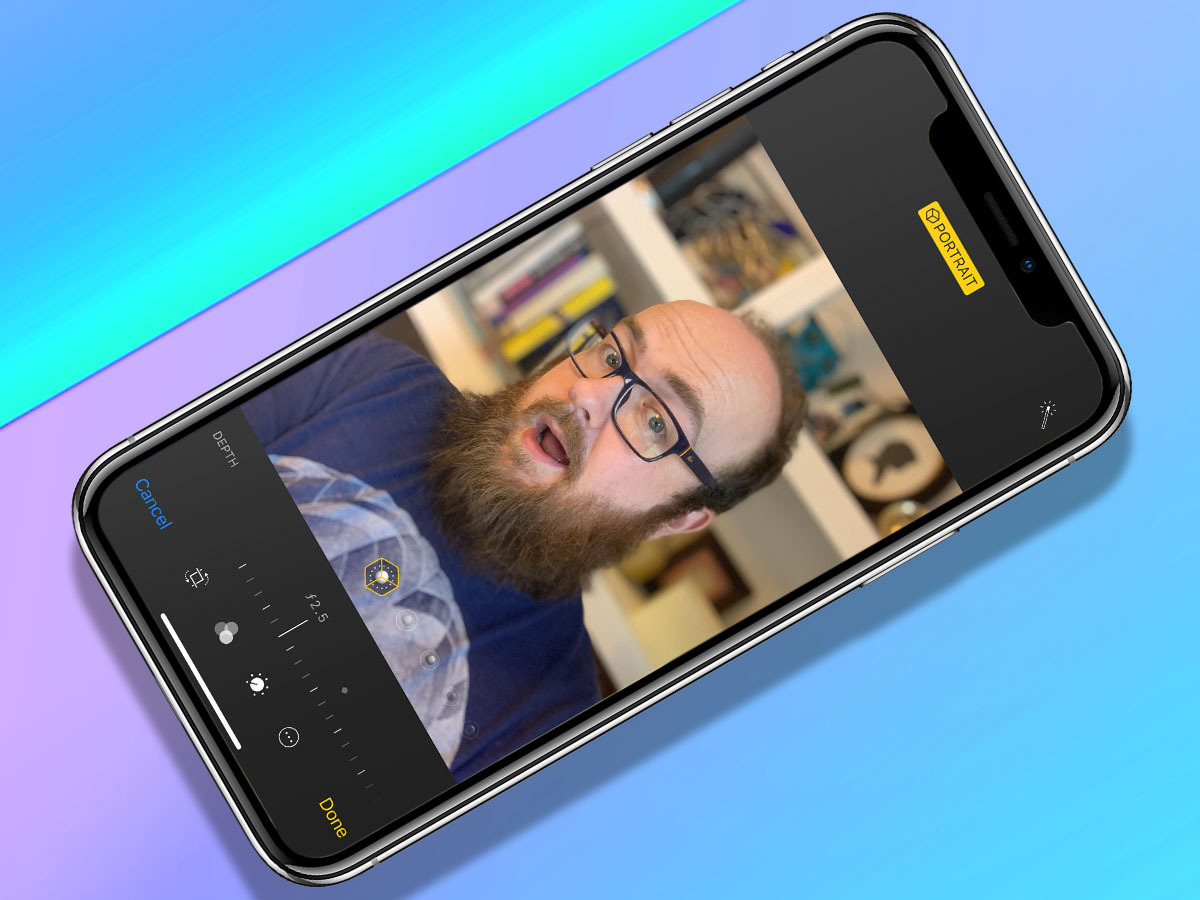
Portrait Mode has been a feature of Apple’s dual-camera phones from the start, and last year’s iPhone X added it to the front camera too – but now the iPhone XS and XS Max take it to another level with Depth Control.
Depth Control lets you alter the focal length of a photo after you’ve taken it. What does that mean? Well, it essentially lets you tweak the background blur and bokeh effects of a photo in real-time by using a slider, letting you increase or decrease the blur to find the ideal amount.
It’s easy! Once you have a photo taken in the Portrait Mode from either the front or back cameras, just tap Edit and a slider will appear below the shot. Slide your finger left to right to set the desired effect.
10) Make the most of DND

Apple’s Do Not Disturb feature is ideal for silencing your iPhone at night, ensuring that messages and other notifications don’t rouse you from your slumber – but in iOS 12, it’s a lot smarter and more customisable before.
You can still tap and leave it on until you switch it off, but now you can also set Do Not Disturb for one hour (when you need a break from the phone), until evening/afternoon/morning, until you leave your current location (perfect for when you’re at the cinemas), or until an ongoing calendar event ends.
Press and hold the DND icon (it looks like a crescent moon) in Control Centre for easy access, or find Do Not Disturb under Settings to customise your options.
11) Take a screenshot
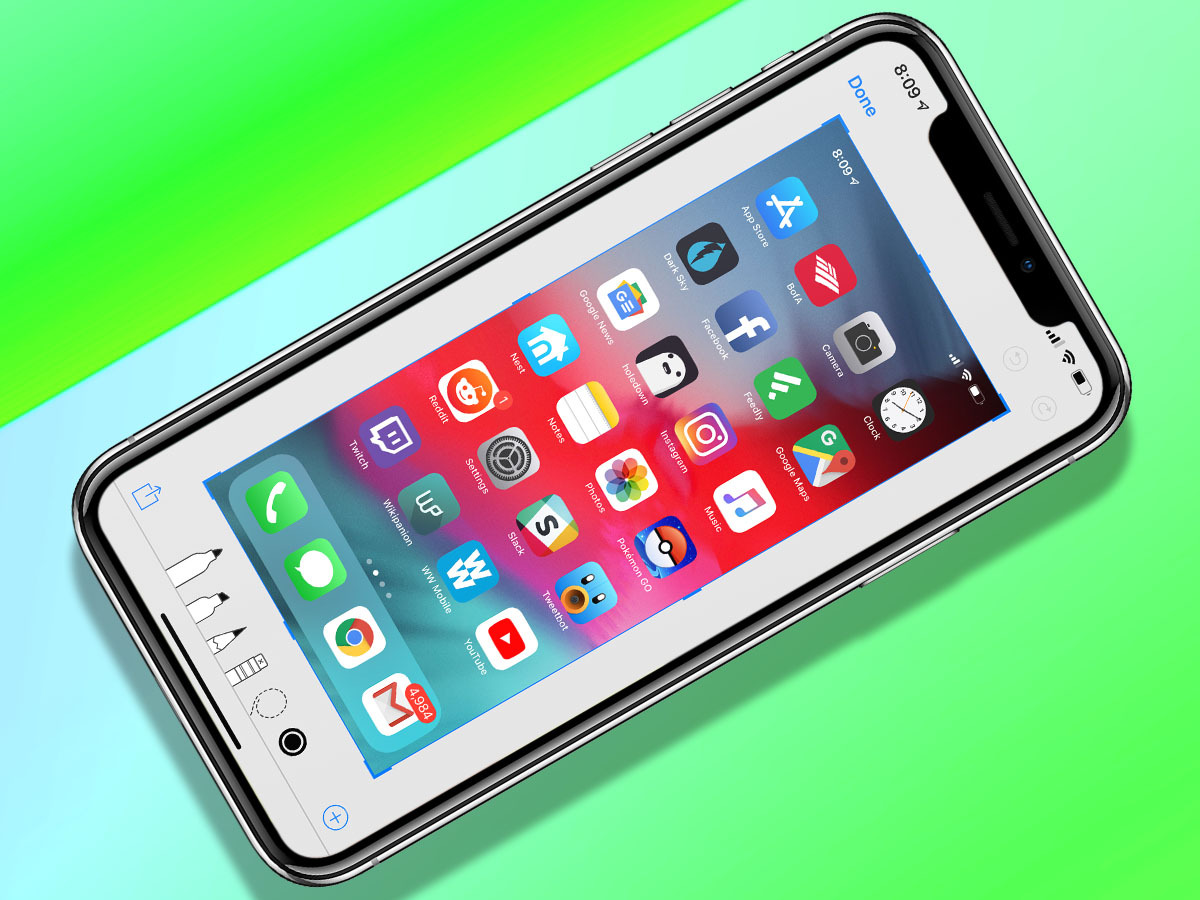
Need to snag a screenshot to capture a cool moment from a game, or maybe save a record of a message sent by a friend (not for blackmail or anything, of course)? As ever, iOS 12 lets you take screenshots with ease, but the process is a bit different on the new iPhones given the lack of home button.
Now, you’ll click in the right side button and the top volume button (left) at the same time – and that’s it. If done correctly, you’ll hear a camera shutter sound and see a flash before a small preview appears on the bottom left corner. You can swipe it away to dismiss, or tap to do quick edits before saving.
 Andrew Hayward
Freelance Writer
Andrew Hayward
Freelance Writer