How to photograph tonight’s Perseids meteor shower
The blackness of space will tonight be turned into a beautiful light show - here’s how to snap it
Think yourself a rock fan? Well, you’re in for a real treat this evening.
The annual Perseids meteor shower is coinciding with a new moon, meaning (weather permitting) an ultra-clear view of centuries of space rocks burning up in the Earth’s atmosphere every hour.
Here’s how to capture this unique event on your snapper.
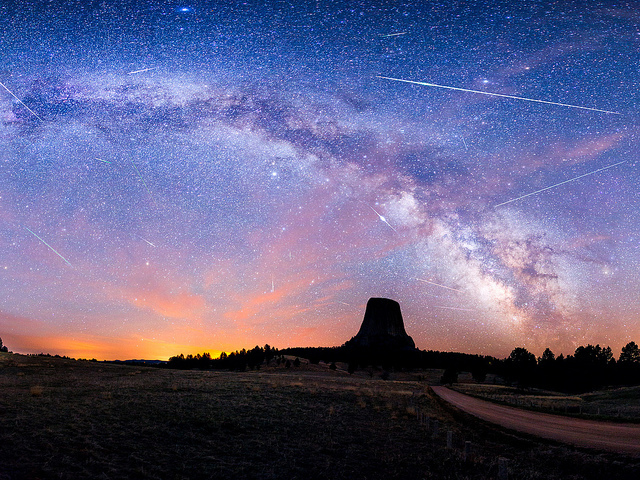
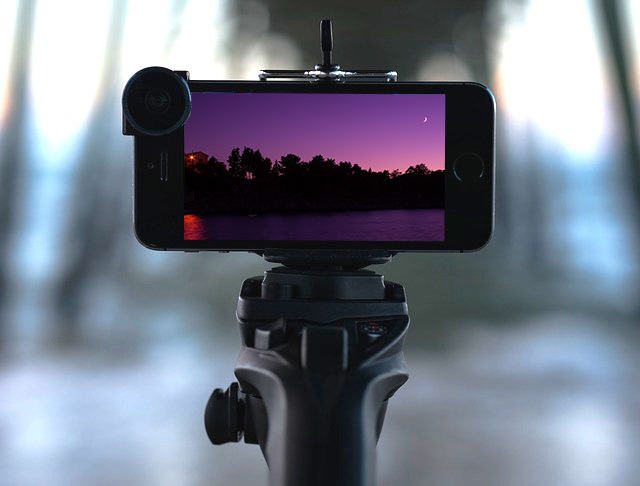
Image: David Kingham on Flickr
Take your Mercedes to Perseids
In order to get a clear view of the shower, you’ll need to do two things.
First, hop in your car and drive into the countryside. Or, at least, find a spot as far away from light sources as you can – it needs to be dark in the vicinity so that the light from the meteors can reach both you and your camera.
If you’re in a city, try to find a large park, ideally enclosed by trees that will block out the light pollution from street lamps and nearby buildings. The city might look pretty in the dark, but it’s not what you’re there to snap.
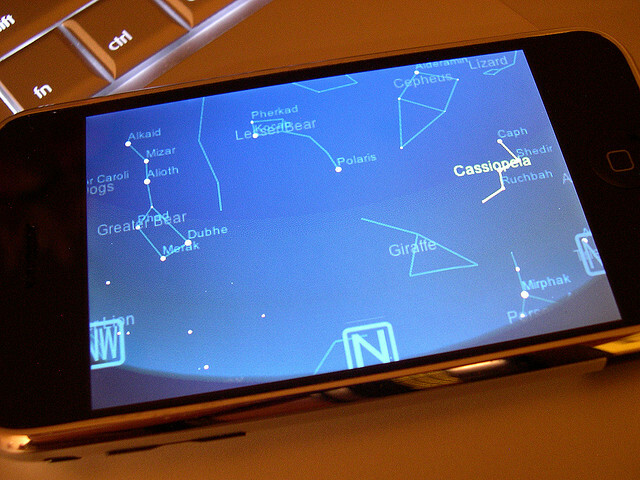
Second, and this is the trickier part, you’ll need to locate the constellation of Perseus in the night sky. This is the point from which the meteors appear to originate on the ground (the radiant), hence the shower’s name.
True, it doesn’t matter if you can’t find it – meteors will appear in all parts of the night sky whichever way you’re looking. But, for the purposes of framing your pics, you might just want to.
So, what you need to look for is the W-shaped constellation of Cassiopeia – in the Northern Hemisphere, it’ll be to the North East, and much brighter than the faint Perseus. Then, wait for the first meteors and trace them back to their origin.
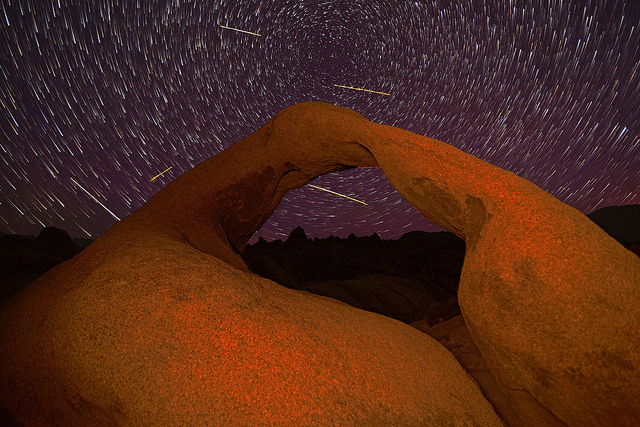
Image: Gordon Mei on Flickr
Perseid-what?
Each August our little blue planet swings its way through a cloud of Comet debris from Swift-Tuttle, with blocks of ice and dust smacking into the terrestrial shield at 60km/s (a whopping 130,000mph).
And when they meet with our atmosphere, things get a bit heated causing glorious streaks of green light that can be seen, and more importantly photographed, by us mere humans standing 12km below.
Get your kit on
Before you jump in your wheels, you’ll need to grab a few bits of kit to make the most of the shower.
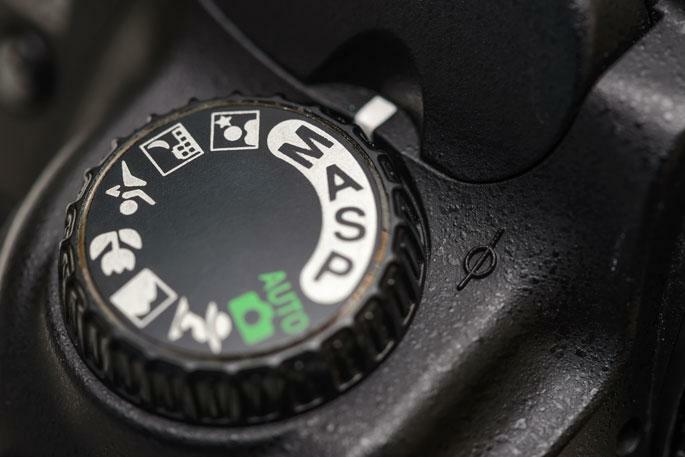
Shooting at night is a more straightforward affair than photographing something like an eclipse, but the one key thing is to use a camera with a manual mode.
True, you can flick your snapper on to shutter priority and leave it open for a good while, but manual will give you far better control over aperture and ISO.
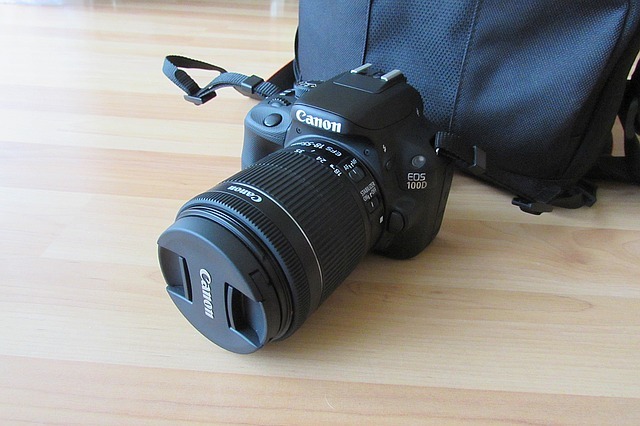
Of course, a DSLR or compact system camera of any quality will be the best bet: these tend to have much bigger sensors than compacts and bridge cameras, meaning they can capture more of the limited light around at night.
That said, many higher-end point-and-shoots now come with a manual mode, and you can even download long-exposure apps for your phone, so don’t abandon hope if you don’t have a big-body brute of a shooter.
As for lenses, if you have the luxury of selection, there really are a host of options. You can throw it out wide with a 12mm, to capture the entire landscape in the throes of meteoric bombardment; alternatively, if you’re somewhere with particular features on the horizon or interesting focal points nearby, you could opt for a telephoto to pick these out against the streaky sky.
You’re also going to want a tripod: pretty essential this, as you’ll be taking long exposures.
READ MORE › Which smartphone has the best camera
Get up to set up
With your kit pre-loaded in the boot, set your alarm for 11pm and get in a quick power nap: though you can catch the hot rocks most nights this week, tonight (12 August) and the early hours of tomorrow morning are the real highlights, with up to 100 meteors an hour streaming down from the heavens.
As for camera settings, much of this will come down to the type of shot you’re going for.
For a standard, wide sky, long-exposure shots it’s best to combine a wide aperture (somewhere around f/2.8) with a fairly high ISO and an exposure between 30s and a minute.
Modern DSLRs can cope with much higher ISOs than their smaller-sensor siblings, with some going comfortably as high as 6400, though 2500 is probably more than high enough a sensitivity on a 30s exposure.
Thankfully, with the meteor shower going on for a good few hours until dawn on Thursday, you’ll have plenty of time to figure out your ideal settings.
Highly sensitive › Canon’s new camera has an ISO of 4,000,000
Slow and steady wins it
Of course, the longer the exposure, the longer the trails and the greater the number of meteors you’ll snap on your shot. You can have a play around with longer and shorter exposures to see what effects come out – if your camera has a bulb mode, you can leave the shutter open for hours to create a skyscape scattered with shooting stars.
As you decrease the shutter speed, it’s a good idea to decrease the ISO in increments to keep the right light balance, and this is also where that most fundamental of all pieces of kit comes in: the aforementioned tripod.
Keeping your snapper steady when shooting is an absolute must, whether you opt for a tripod, gorillapod or a bit of duct-tape and a kitchen roll. If you don’t, your images will be more blurry streak than starry chic.
Play the frame game
Using a tripod can make framing a little tricky if it’s an awkward one to adjust, as can the darkness; arranging angles through a viewfinder or on a small LCD display isn’t the easiest of tasks in the near pitch-black.
As such, if possible, it’s helpful to pick out spots on the horizon or particularly bright stars to help you position your setup. Failing that, take a bright torch or laser pen and shine it on the nearby ground and surroundings as you look through your viewfinder – though beware: this technique does tend to incur the wrath of other photogs busy with long exposures nearby.
Once you’ve grappled with some run-of-the-mill streaky sky shots, you could try getting to grips with a few other techniques.
One option is to take an image with the same settings every few minutes, and, at the end of the night, overlay them on to one another using software to produce a composite image of the whole shower.
Alternatively, using the same idea, you can combine your series of shots into a timelapse using one of the many compilers out there, leaving you with a glorious movie of glowing meteoric brilliance. Just remember to keep that tripod still.
Image: Kartik Ramanathan on Flickr
Finally, and here’s the most important bit of all, pray for good weather – all clouds and no sky makes for pretty dull photos.
The Perseid meteor shower will be at its peak from 2300 BST on Wednesday 12 August until the early hours of Thursday 13 August.
RELATED › How to take brilliant eclipse pictures
 Chris Rowlands
Freelance contributor
Chris Rowlands
Freelance contributor