How to use Stolen Device Protection on your iPhone
Here's a new way to keep your accounts safe from prying eyes
Starting with iOS 17.3, Apple iPhones have an extra layer of security. Stolen Device Protection aims to prevent unauthorized access to your accounts and personal information if your phone is nicked, or lost in an unfamiliar location.
It works in tandem with existing iPhone security tools including two-way authentication, Find My iPhone, and Face ID or Touch ID. If the idea of safeguarding your device sounds like a smart move, here’s everything you need to get Stolen Device Protection up and running.
What is Stolen Device Protection?

Your iPhone has Location Services enabled by default, letting it recognise regular haunts like home or work. With Stolen Device Protection enabled, it’ll add extra security measures to certain actions and features when you’re outside of these zones. The idea is to stop someone who’s stolen your device and knows your passcode from making unauthorised changes.
That means Face ID or Touch ID will be required for changing your Apple ID password, disabling Find My device tracking, or erasing your iPhone. A time delayed second biometric check boosts security further. When your iPhone is in a familiar location, you can use your device passcode without limitations.
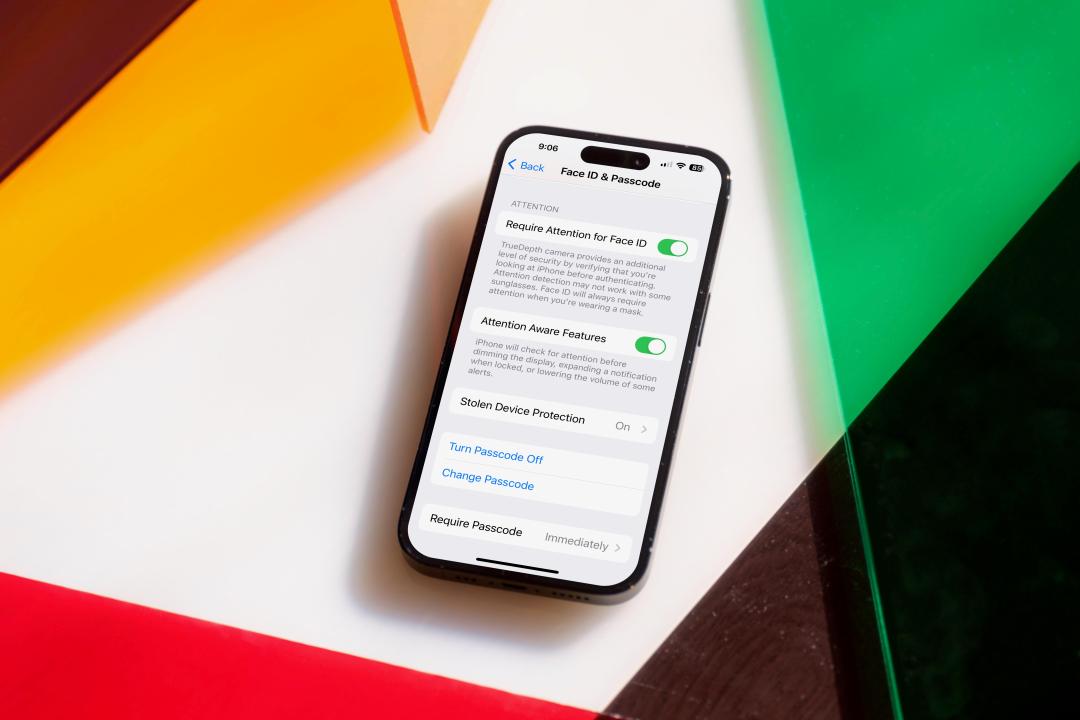
Turning on Stolen Device Protection
As long as your iPhone is running iOS 17.3 or later, you’re good to get started. Make sure you have set a device passcode, enabled either Face ID or Touch ID, set up two-factor authentication for your Apple ID, turned on Find My iPhone, and enabled Significant Locations.
Now go into the Settings app, choose Face ID & Passcode (or choose Touch ID & Passcode if you have a phone with Touch ID) and enter your device passcode. Scroll down and select Stolen Device Protection, then tap Turn On Protection.
For even more security, you can require a security delay “Always” instead of “Away from Familiar Locations.” Be aware this means you won’t be able to perform certain tasks without a delay even when you’re home.

What happens when activated?
With Stolen Device Protection switched on, your phone will do a Face ID or Touch ID biometric check before using any passwords or passkeys saved in Keychain; using payment methods saved in Safari (autofill); turning off Lost Mode; or erasing all content and settings. Applying for a new Apple Card, viewing your Apple Card’s virtual card number, or taking certain Apple Cash and Savings actions in Wallet will trigger the same check, as will trying to use your iPhone to set up a new device.
There will also be a one-hour delay when trying to change your Apple ID password, sign out of your Apple ID, update Apple ID account security settings, or add or remove Face ID or Touch ID. You would also see a delay when attempting to change your iPhone passcode, reset All Settings, turn off Find My, or turn off Stolen Device Protection.
Turn off the feature

If you’ve changed your mind about added security (or have decided to become a hermit and never leave the house again) it’s a breeze to disable Stolen Device Protection. Open the Settings app, select Face ID & Password or Touch ID & Password, and enter your device passcode. Scroll down, then turn off the feature.
Just remember: You can’t turn off the feature if you’re in an unfamiliar location.
 Bryan M. Wolfe