How to shoot better videos on your smartphone
Smartphoneography can be a tricky business, so arm yourself with our expert tips

Ever uploaded your holiday vids to Facebook only to be underwhelmed by the result? Turns out the problem’s not Facebook. It’s you.
That’s because while capturing video on your smartphone is easier than winning Olympic gold in cheese-eating, capturing great video on your smartphone is a little more tricky.
Fortunately, we recently completed a Masters Degree in Advanced Smartphoneography, so we know what we’re doing. So just do what we do and you’ll be fine.
Tip #1: Get a grip
First up, you’re holding the phone wrong. It goes sideways, like your TV. Don’t be fooled into thinking that because some social media players can handle vertical video that it’s a nice thing to watch. Don’t argue. Just turn the phone.
Secondly, you’re still holding the phone wrong. Your hands are shaky, and you need a mount – either to attach to a tripod, or just to hold it more steadily. It’s not just about your audience – the video compression software in the phone doesn’t like dealing with tiny movements, and you end up with soft areas in your scene.
Have a look at these:
Manfrotto Klyp+ system for iPhone 5/5S (£10)
Manfrotto Klyp+ system for iPhone 6/6S (£15)
You have an Android phone? Sorry. Let’s look at something that’s not model-specific. After all, you bought a stylish case for your phone, so why take it off, just to put on a camera system? That’s not very ‘on-the-go’, is it? Take a look at these:
These will last even after you’ve upgraded to next year’s model, too. If you’re not bothered about quick and compact setups, and want to really go to town with DSLR lenses – maybe you’re making a proper movie on your phone – try this monster cage system.
It takes a bit of practice setting up, and if you’re using the 35mm adapter for Canon EF lenses, you’ll also need a camera app that flips the picture back the right way around, but it’s the best phone cage we’ve tried so far.
Tip #2: Sound it out
Next – your sound is awful. Are you seriously recording with the built-in microphone? That just won’t do.
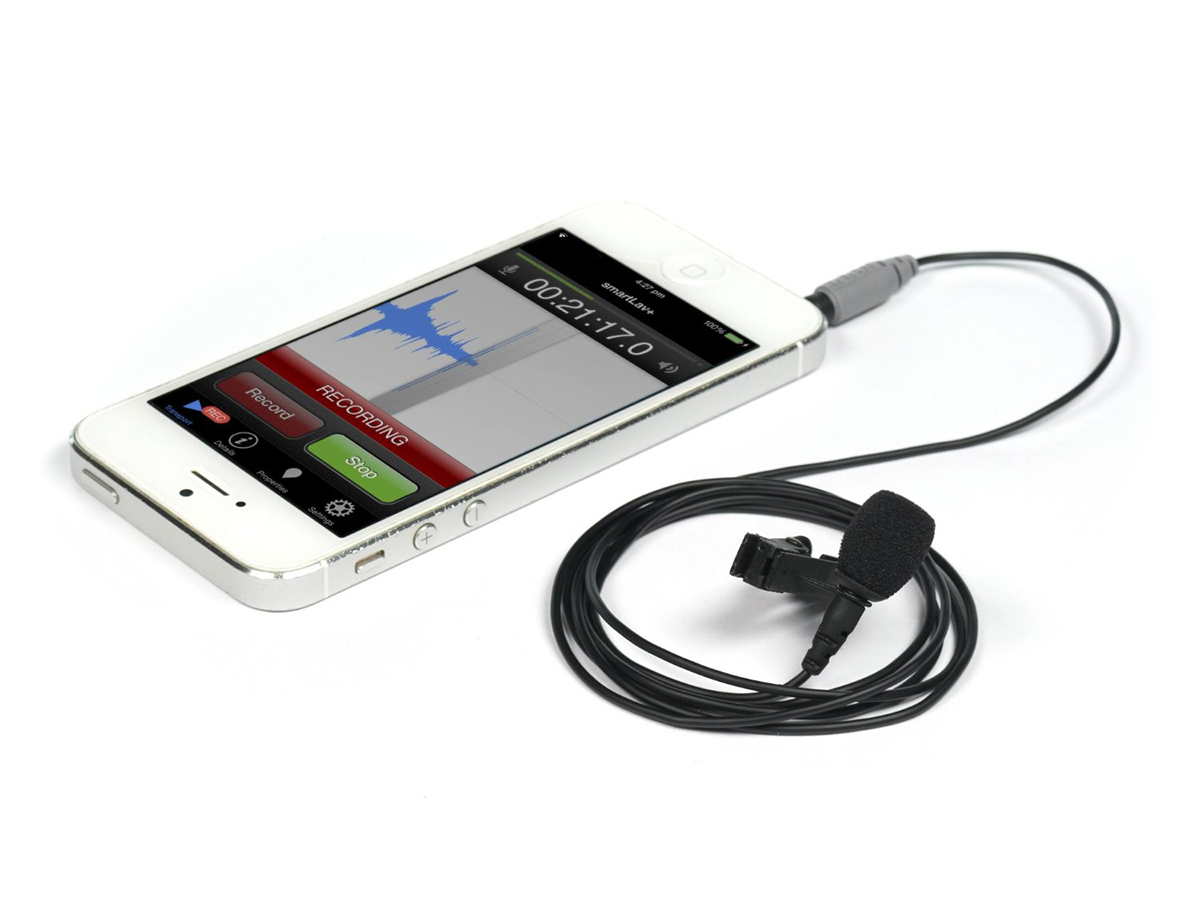
We love Rode Mics, and they do some great smartphone-compatible kit. The Rode SmartLav+ (£45) is a great tie-clip interview mic, and works with iOS and Android phones. The Rode VideoMic Me (£48) is a mini shotgun mic – but currently only supports iOS.
Believe it or not, if you’re in a pinch, close-recording voices with the in-line mic on your headset will work better than the phone’s own mic. Of course, once the iPhone 7 comes along, you’ll need to have a Lightning-connected mic, so you’ll want something else. The Sennheiser ClipMic Digital (£140) is a tie-clip mic with a lightning connector, while the Shure MV88 MOTIV (£120) is a mini-shotgun-mic with a Lightning connector.
Tip #3: Master the apps
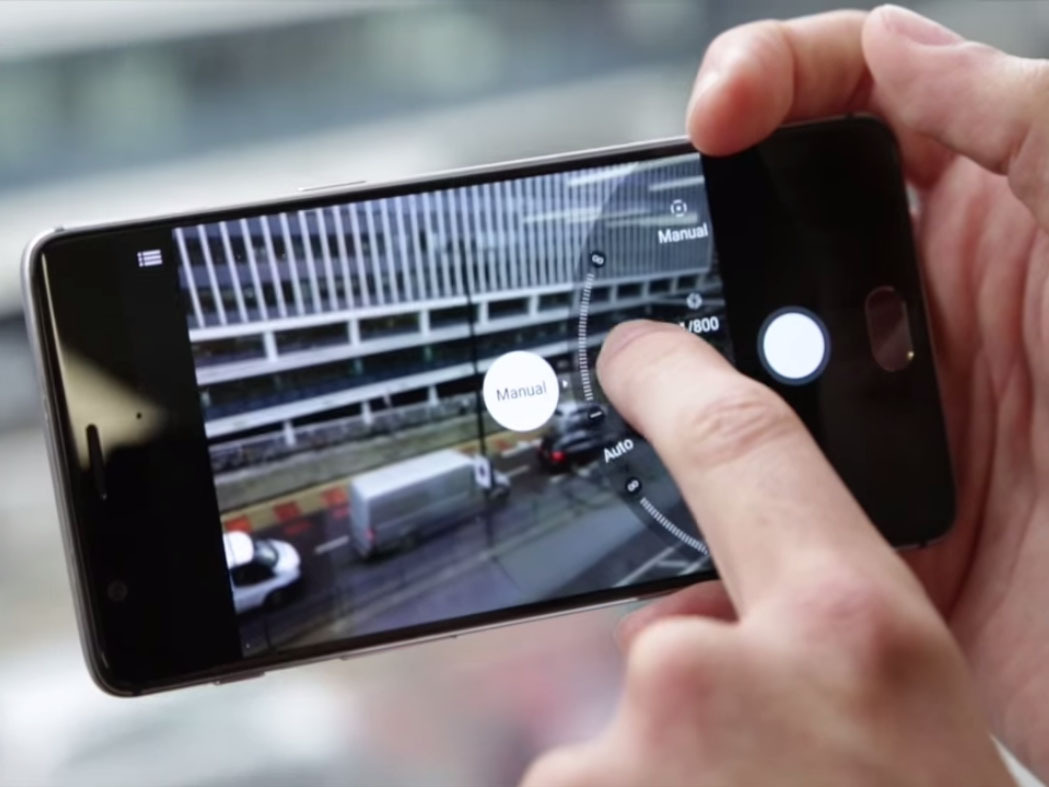
Once you’ve got good sound, and a firm grip on your phone, you should really learn how to use the app that comes in the box. Golden Rule: Auto is for WIMPS!
If you have manual controls, learn them and use them – the OnePlus 3 has great manual controls. The stock Android app does not. The iPhone camera app doesn’t have manual, but uses a semi-auto system that can be manipulated easily to get the shot you want.
Tap-to-focus and Tap-and-hold-to-lock-focus are your friends. Tap the screen on your subject, and watch the yellow box flash, indicating that where you’ve tapped is now in focus. It also re-exposes the overall image based on the light within the yellow square.
You can drag up and down now to make the image darker or lighter. However, if your subject moves, or you move the phone, you’ll revert to full auto – so you might prefer to tap and hold. It does the same job as tap-to-focus, but it locks the focus and exposure at that point, and you have to actually click out of the yellow box to change your selection.
Just tap the screen and hold your finger on it for a couple of seconds, and the yellow box flashes – this time, though, you’ll see ‘AE/AF Lock’ at the top of the screen. Drag up and down like before to change the exposure.
Above all, don’t forget the basics – make sure you can keep your phone steady and that your sound is good. Learn how to control your image on the fly, and you’re ready to shoot some decent moving images.
Oh, and don’t forget to check out our the rest of our photography specials to level-up your skills even further.
 Peter Brown
Senior Video Editor
Peter Brown
Senior Video Editor